Saturday, November 29, 2008

Caramel Cake - Daring Baker's Challenge

Since my dad's birthday falls in November, as soon as I saw this recipe, I knew this would be his birthday cake, and I was quite excited and also quite apprehensive. This cake represented many firsts for me - my first caramel syrup, my first browned butter, my first cake with icing... in fact it was only my second cake! So I was pretty nervous about it, and I warned my parents to have some ice cream as a back-up in case disaster struck!

Luckily, the ice cream was unnecessary.


Much to my surprise, the cake turned out wonderfully. I knew it would probably taste good no matter what, but the batter held together, the cake rose the way it should, and in general, it was absolutely incredibly delicious. My aunt even asked me to make it for her birthday too (which isn't until April so I might be ready to tackle it again by then).

The recipe comes courtesy of Shuna Fish Lydon, of the blog eggbeater, which is a great resource for people who love to bake. The original recipe can be found here.

Co-hosting this month's challenge are Dolores (http://culinarycuriosity.blogspot.com/) , Alex (Brownie of the Blondie and Brownie duo: http://blondieandbrownie.blogspot.com/), and Jenny of Foray into Food (http://forayintofood.blogspot.com/). You can check out their sites for all the rest of the completed challenges.

Below is the recipe, along with some pictures and my notes about anything special I did, or additions I made (we weren't allowed to change the recipe but we could infuse things into the caramel syrup and we could decorate the cakes however we wanted, so there was some room for experimentation). I ended up infusing the caramel syrup with crushed amaretti, which I love, and then adding some slivered almonds on top of the frosting to go with the amaretti. The almonds were actually a really nice touch, because the frosting was so sweet and rich that the nuttiness provided a nice contrast and helped me eat even more of it!!


The recipe contains 3 parts - the cake itself, the caramelized buttercream frosting, and the caramel syrup, which goes into both the cake and the frosting. I made the caramel syrup 2 days ahead and the frosting 1 day ahead, which helped me stress out less on actual cake-baking day. My notes come in purple after the double asterisks.

CARAMEL CAKE WITH CARAMELIZED BUTTER FROSTING

10 Tablespoons unsalted butter at room temperature
1 1/4 Cups granulated sugar
1/2 teaspoon kosher salt
1/3 Cup Caramel Syrup (see recipe below)
2 each eggs, at room temperature
splash vanilla extract
2 Cups all-purpose flour
1/2 teaspoon baking powder
1 cup milk, at room temperature

Preheat oven to 350F **or 180º C

Butter one tall (2 – 2.5 inch deep) 9-inch cake pan.

In the bowl of a stand mixer fitted with a paddle attachment, cream butter until smooth. Add sugar and salt & cream until light and fluffy.

Slowly pour room temperature caramel syrup into bowl. Scrape down bowl and increase speed. Add eggs/vanilla extract a little at a time, mixing well after each addition. Scrape down bowl again, beat mixture until light and uniform.

Sift flour and baking powder.

Turn mixer to lowest speed, and add one third of the dry ingredients. When incorporated, add half of the milk, a little at a time. Add another third of the dry ingredients, then the other half of the milk and finish with the dry ingredients. {This is called the dry, wet, dry, wet, dry method in cake making. It is often employed when there is a high proportion of liquid in the batter.}

Take off mixer and by hand, use a spatula to do a few last folds, making sure batter is uniform. Turn batter into prepared cake pan.


Place cake pan on cookie sheet or 1/2 sheet pan. Set first timer for 30 minutes, rotate pan and set timer for another 15-20 minutes. Your own oven will set the pace. Bake until sides pull away from the pan and skewer inserted in middle comes out clean. Cool cake completely before icing it.

Cake will keep for three days outside of the refrigerator.

CARAMEL SYRUP

2 cups sugar
1/2 cup water
1 cup water (for "stopping" the caramelization process)
** A small handfull of amaretti, crushed thoroughly
In a small stainless steel saucepan, with tall sides, mix water and sugar until mixture feels like wet sand. Brush down any stray sugar crystals with wet pastry brush. Turn on heat to highest flame. Cook until smoking slightly: dark amber.

When color is achieved, very carefully pour in one cup of water. Caramel will jump and sputter about! It is very dangerous, so have long sleeves on and be prepared to step back. ** I was very worried about this, so I took some extra precautions. I wore oven mitts when I poured the cold water in, but more importantly, I put a colander over the bowl and poured the water through that. This was highly effective in stopping any water from leaping up and burning me.

Whisk over medium heat until it has reduced slightly and feels sticky between two fingers. {Obviously wait for it to cool on a spoon before touching it.} **Here, I poured in the amaretti.


Note: For safety reasons, have ready a bowl of ice water to plunge your hands into if any caramel should land on your skin.

CARAMELIZED BUTTER FROSTING
**I made half this recipe and it was more than enough to give the cake a very generous coat of frosting. However, it does say the frosting will keep for 2 months, so if you want to make extra, I can't imagine that it would be a bad thing!
12 tablespoons unsalted butter
1 pound confectioner’s sugar, sifted
4-6 tablespoons heavy cream
2 teaspoons vanilla extract
2-4 tablespoons caramel syrup
Kosher or sea salt to taste

Cook butter until brown. Pour through a fine meshed sieve into a heatproof bowl, set aside to cool.

Pour cooled brown butter into mixer bowl.

In a stand mixer fitted with a paddle or whisk attachment, add confectioner's sugar a little at a time. When mixture looks too chunky to take any more, add a bit of cream and or caramel syrup. Repeat until mixture looks smooth and all confectioner's sugar has been incorporated. Add salt to taste.


Note: Caramelized butter frosting will keep in fridge for up to a month.
To smooth out from cold, microwave a bit, then mix with paddle attachment until smooth and light

(recipes above courtesy of Shuna Fish Lydon)

My final recommendation - we had the cake with frangelico (an Italian hazelnut liqueur), and it was absolutely heavenly. Overall, a wonderful birthday dessert!

Friday, November 28, 2008

Corn Muffins

I know I'm a day late with these, but yesterday was very busy with preparations and these muffins are good even when it's not Thanksgiving!


In my family, it's a tradition that either my brother or I always makes the Thanksgiving cornbread. We also always use the same recipe which comes from an old, yellowed kid's cookbook we have where all the recipes are accompanied by little sketches showing exactly what to do and most of the dishes are as simple as say, a peanut butter and jelly sandwich.

This recipe is probably the most complicated one in the book in fact. However it is very good. Last year, I made it in Milan for a little improvised Thanksgiving dinner I organized with my German housemate and the guests, who had never eaten cornbread before (they were all either German, Italian, or British), though suspicious at first were quickly won over by it! They were not so quickly won over by the cranberry sauce but I suppose you can't have everything...

This year I decided to spice up the recipe a bit by making muffins instead of bread and I added parmesan to half the muffins and thyme to the other half. Both flavorings worked really well, though I wouldn't advise adding them together (I tried that on a test run and it just didn't work as well).

You will need: (makes about 12 muffins):
150 g plain flour
150 g cornmeal
2 spoonfuls of baking powder
1 spoonful of salt
Maple syrup (the recipe calls for this but you can also substitute honey or another type of syrup, which I did here)
250 ml milk
55 g butter
2 eggs
Parmesan
Thyme

About half an hour or so before beginning, take out the eggs and the milk so that they'll be room temperature when you start your muffins. Preheat the oven to 400ºF/20oºC. In a small saucepan, heat the butter until melted. Set aside to cool.

Use some extra butter to butter the muffin tin (or loaf pan if you want to just make bread). Sift together the flour, cornmeal, baking powder, and salt, and then add in the syrup.

Beat the eggs, and add them to the milk and melted butter. Mix the wet ingredients into the dry ones, stirring until everything is thoroughly mixed, but no more. Just make sure there's no flour anywhere.

Pour half the batter into another bowl. Grate the parmesan over this half, and stir in. Sprinkle a good quantity of thyme into the other half and mix that in too. Spoon the batter from both bowls into the muffin tin.


Bake for about 20 minutes, or until the muffins start to brown on top (it only took about 15 minutes in my unruly oven).

Let cool a bit, but serve warm if possible!
Wednesday, November 26, 2008

Butternut Squash and Leek Soup

I've been meaning to make butternut squash soup for about six weeks now, and somehow I just haven't gotten around to it. It hasn't been for lack of ingredients either - the squash has been sitting patiently on my kitchen table for ages, reminding me at every meal that it needs to be used. Well tonight, inspired by the delicious butternut squash soup my grandmother made this past Sunday, I decided it was finally time for me to have a go at my own version of the soup.

It ended up being the perfect day for it too - cold, gray, rainy, and generally miserable. Just the sort of day when you want to curl up at home with a nice warm bowl of soup and not worry about anything!


I knew beforehand I wanted to incorporate my leeks into the soup, but searching for recipes online, I couldn't find any one recipe that had exactly what I wanted. So, I read through lots of recipes and then used those as a starting point to make my own version, which turned out to be quite tasty, and is given below.

You will need:
1 butternut squash
1 large leek
Broth (several cups)
A few cloves of garlic
A sprig of fresh parsley
Rosemary
Thyme
Salt
Pepper
Olive oil
A handful of toasted pine nuts
Parmesan
Cream

Peel the squash, remove the seeds/inner part, chop into coarse cubes, and set aside. Peel the garlic cloves and crush them. Wash and chop the parsley into very fine pieces.


Remove the outermost leaves of the leek, and rinse the rest thoroughly. Slice lengthwise down the middle of the leek so that the leaves fan out and rinse again, making sure to get in between all the leaves (leeks can get very dirty). When the leek is fully clean, chop it into small pieces.

In a large pot, heat the olive oil, and when it's hot, add the garlic and the leek. Let cook a couple minutes and then add the squash. Slowly pour in the broth and then add the parsley, rosemary, thyme, salt, and pepper.


When the broth starts to boil, turn the heat down very low, cover the pot and let simmer about 45 minutes, stirring every so often.

Since I don't have a food processor or an immersion blender, I left the soup fairly chunky, but once the squash started to soften I bashed it up a bit with the spoon so that there weren't any super-large chunks.

When the squash is fully softened, grate the parmesan and stir it in.


In each bowl, place a few toasted pine nuts. Spoon in the soup and then pour a spoonful or so of cream over the top. Stir up and eat immediately.

Tuesday, November 25, 2008

Fagioli all'uccelletto

This Tuscan bean dish is perfect on a cold, gloomy day, like the ones we've finally started having here in California!


Fagioli all'uccelletto, which means something like "beans in the style of the little bird" is a Tuscan and particularly a Florentine specialty, which is generally made with cannellini (the white, kidney-shaped beans). It's ridiculously simple, but I always forget that often the most delicious dishes are ridiculously simple - for example my personal favorite thing to eat in the world - bread and cheese!

As for the name, from what I can gather it seems that the most likely explanation is that these beans are prepared with the same seasonings people would use to cook birds. Makes sense to me, but I like to think there's a stranger, more romantic explanation somewhere...

For a large pot (serves about 4), you will need:
400 g. dried cannellini (you can also use the canned variety which cuts out a whole lot of preparation time)
250 g. tomatoes
Several leaves of sage (I've also used dried sage when I couldn't get any fresh and I can assure you that fresh is better)
A couple cloves of garlic
Olive oil
Salt
Pepper

If you're using dried beans, they will need to soak for at least 8 hours, preferably 10-12 or even more. If you leave them to soak before going to bed, they should be fine for the next day. Rinse the beans first, then put them in a pot and fill the pot with water. If possible, change the water every so often.


Approximately an hour and a half before you plan to eat, bring the water with the cannellini in it to a boil, and then let them simmer for at least 45 minutes. It's important to turn the heat down quite low after the water starts boiling so that the cannellini don't turn into mush!

While the cannellini are simmering, peel the garlic cloves and crush them. Wash the sage leaves and chop them up quite finely. If you're using fresh tomatoes, bring some water to a boil, wash the tomatoes, and use a paring knife to carve a little x into the bottom of each tomato. When the water's boiling, throw the tomatoes in and let them sit for about 30 seconds.

Drain the tomatoes and rinse them quickly with cold water. The peels should come off quite easily now and the tomatoes should be cool and easy to handle. Deseed the tomatoes if you're up to it - or at least try to get rid of the core and the juice. Chop up the remaining pulp.

In a large pot, heat some olive oil. When the oil is hot, add the garlic and sage and let cook until aromatic, about 30 seconds or so. Turn the heat down and add the tomato pulp. Sprinkle everything with salt and pepper.

Drain the beans and pour them in (or for the canned variety, rinse them off and add them in). Stir everything up, and then cover the pot. Turn the heat to the lowest degree and let cook about 30 minutes, stirring every so often.

Eat and enjoy!

Monday, November 24, 2008

Pan Tomate

This Catalan "dish" is about as simple as you can get, and yet it's one of my favorite appetizers because it's so fun to make, especially with a big group of people.


I was introduced to Pan Tomate (literally "tomato bread") while staying with the family of a friend in a little village way up in the Pyrénées. They were wonderful people with a very lively family full of small children and animals. And Chantal (my friend's aunt) certainly knew how to cook! Every meal she served was sumptuous, fun, and far more food than we could possibly eat. But we gave our best efforts!

Even with all the fancy cooking, my favorite dish was this simple appetizer which came, as they told me, from the typical workman's lunch in the region. The way they explained it, the men's wives would set them off in the morning with a hunk of bread and some tomatoes, and at lunchtime the men would use their work knives to slice the tomatoes in half and then rub the halves all over the bread. A very practical way to get a nice, fresh meal without having to come home!

We ate pan tomat in the same way, rubbing the tomatoes on ourselves, and that's what makes this dish so fun, despite the sparsity of its ingredients. I highly recommend this for largish dinners with family, friends, and of course, good wine. As this can be somewhat messy, it is not advisable for fancy dinner parties where you're trying to impress people, but those aren't nearly as enjoyable as the other kind!

You will need:
A couple of loaves of good, fresh bread. High-quality bread is important here (and in my mind, everywhere else as well). The bread should have a good hard crust. Otherwise, tomato juice will get all over you!
Several fresh tomatoes. I recommend medium-sized round tomatoes - the kind you would put in a salad.
Olive oil
Salt
Several slices of prosciutto crudo (or jambon de pays, as we called it there), again of high quality. The prosciutto is optional, but I think it's a nice addition, especially for special occasions.

Cut the bread into largish hunks, and then slice the hunks down the middle, so that each piece has crust on the bottom. Place the bread into one or more baskets for people to grab from. Wash the tomatoes and slice them into halves, or quarters if they're large, and place them into one or more bowls, just like the bread. You could also have people slice their own tomatoes at the table, but that might get a bit complicated. As it is, this dish requires a lot of passing around of olive oil, salt, etc.

Put out the olive oil and salt, along with the bread and the tomatoes, and a plate with the prosciutto if desired.

Pour everyone a generous glass of wine (featured here is a lovely prosecco - carpené malvolti di conegliano).


Next, demonstrate for your guests how to make pan tomat: take a hunk of bread and drizzle a bit of olive oil onto it. It's not important to spread the olive oil out evenly because the tomato-spreading will take care of that. Sprinkle salt onto the olive oil. Then, with gusto, take a tomato half and rub it all over the bread, leaving the leftover tomato on if you want, though that's not necessary. Top the tomatoed bread with a slice of prosciutto, take a good sip of wine, and eat, encouraging your guests to do the same!

Ideally, this appetizer course should go on quite a bit, with lots of tomato-rubbing and merry-making.

Sunday, November 16, 2008

Persephone's Delight

The other day I was discussing cooking with a friend of mine, and he asked me what was in season right now. I mentioned various vegetables, and then I added that I had been seeing pomegranates all over the markets lately. I almost never eat pomegranates, but my friend got really excited and told me I absolutely had to make chocolate-covered pomegranate seeds. "You get the sweet, dark chocolate and then suddenly the tartness of the pomegranate seed like a little surprise!" he rhapsodized.


I agreed it sounded good, but I didn't think I would actually get around to making it. Well, a week or so later, I heard about this contest for... recipes involving pomegranates! I decided that this was a sign from above that I really ought to try my friend's recipe, so I dutifully went out and bought a pomegranate and proceeded to spend my afternoon making little chocolate pomegranate drops.

While it is a bit time-consuming, the end result is delicious and you can freeze them and keep them for a long time, so it's worth making a bunch at once. And so, here is my recipe and contest entry for Persephone's Delight (my own name).

You will need:
One pomegranate
A large bar of high-quality dark chocolate (I used Valrhona 61%)

Slice the pomegranate into quarters and scoop out the seeds onto some paper towels to dry up any extra juices. Cut the chocolate into smallish chunks.

In a large bowl, bring some water to a boil and place another metal bowl over that bowl. Place the chocolate in the top bowl. When the water is boiling, turn the heat down a bit and let the chocolate melt thoroughly, stirring every so often. When the chocolate is all melted, turn off the heat.

Prepare a baking sheet by covering it with wax paper. Using a toothpick, spear a pomegranate seed and roll it around in the chocolate, then place it on the wax paper. Continue doing this until you have:
a) used up all your pomegranate seeds
b) used up all your chocolate
c) used up all the space on your baking sheet, or
d) gotten so tired of sticking each individual seed into the chocolate that you're ready to just dump them all in and call it a chocolate pomegranate stew.


Note that this recipe would probably be a good one to make with friends (lots of them), while sitting around discussing Greek myths. You can also read Eavan Boland's fantastic poem, "The Pomegranate" as an accompaniment to your culinary activities.

Once you have reached point a,b,c, or d above, place the little droplets in the fridge to harden (I also think they taste better cold because the pomegranate flavor is more pronounced against the chocolate).

An hour or two later, and voilà! A delight that would have had Persephone eating far more than four measly little seeds.

Saturday, November 15, 2008

Pizza Tonno e Cipolla

Pizza tonno e cipolla, that is, pizza with tuna and onions, is one of my all-time favorite pizzas.


Unfortunately, it's a pizza that isn't too popular here in the U.S. Even though we're willing to put just about anything on our pizzas, some of them quite horrendous, tuna does not seem to be a topping people think of when writing their pizza menus.

So, of course, I decided to satisfy my cravings by making my own! I had also just bought a baking stone, and this seemed like a good opportunity to try it out. Well, it seems I needed a bit of practice with this new stone. Even though I had successfully made pizzas on my parents' baking stone, this time it took me not one, not even two, but three tries before I could declare myself successful in my pizza-making endeavor. The first time I tried, it was actually more an ingredient issue as I didn't realize my flour was not high-gluten; the pizza came out OK, but it was a bit more work and one side got a bit smushed when entering the oven.

The second time was, at least presentation-wise, a disaster. The pizza dough stuck horrendously to the peel, so much so that even with the help of a spatula I couldn't get it onto the stone. Eventually I had to transfer the gooey mess that had once been a lovely-looking pizza onto a baking sheet and bake it that way. The good news was it still tasted fantastic, but unfortunately not very photo-worthy.

Well, this time, I learned from my previous mistakes and now, an older and wiser pizzaiola, I present you with my method for making a pizza tonno e cipolla.

I used a slightly different dough recipe this time, partly due to necessity (i.e. lack of ingredients) and partly just to experiment. It came out just as good as my previous doughs, so I think either one is fine. I also added cherry tomatoes because that was the way my favorite lunch pizzeria in Milan did it, and I loved it.

For the dough:
150 g bread flour
50 g whole wheat flour (this is how I compensated for the fact that none of the grocery stores I visited had whole wheat bread flour. It's not nearly as hearty as using all whole wheat flour, but it's enough to add some oomph to the dough!)
About half a glass of water
Half a package of yeast
A small spoonful of sea salt
A small spoonful of sugar
A larger spoonful of olive oil

For the toppings:
A small cupful of tomato sauce (I just use canned tomatoes for pizzas)
About 100 g pizza mozzarella
1 small-to-medium yellow onion
About 100 g tuna
A handful of cherry tomatoes
Another spoonful of olive oil
Salt
Pepper
Oregano

A note about the tuna - using higher quality tuna really makes a difference here. I still remember the pizza tonno e cipolla I had at a pizzeria in the Navigli section of Milano where I'm sure they used fresh tuna because the taste was just amazing. Of course, it will still taste good with standard canned tuna, but I think it's worth it to try to get the best kind available. One brand I like is Ortiz, which comes preserved in brine in a glass bottle.

A couple of hours before you want to eat your pizza, prepare the dough. If you're using active dry yeast, activate it by adding it to a small cup of warm water, along with the sugar. Sift together the two flours and then add the sea salt. Form the flour into a sort of fountain, high on the sides and low in the middle. Pour the yeast mixture into the center and gradually blend in the flour from the sides, adding more flour from farther out as you go. Add in the oil and then the water, a bit at a time, blending until you get a smooth, slightly sticky dough.

Turn the dough out onto a well-floured surface and knead for several minutes until the dough becomes resistant, bouncing back when you press it down.

Form the dough into a ball, coat it lightly with oil and place in a large bowl. Cover the bowl with plastic wrap or a cloth or some such thing and leave it in a warm, non-drafty place. Do not put it in your oven, as this is the point where you should start preheating. Remember, to make a good pizza you want your oven to be hot hot hot!

If you own a baking stone, make sure the stone is in the oven before you start preheating. If you plan to bake your pizza on a baking sheet, do not put the sheet in the oven. In either case, heat the oven to about as hot as it will go, usually 500ºF or 250º C.

After about 45 minutes, start preparing your toppings. One of the reasons I think my second pizza stuck so much was that I took too long to put the toppings on. The quicker you are in topping your pizza, the less chance there is that it will stick to the peel, so make sure everything you need is perfectly ready before you roll out the dough.

Begin by peeling the onion and chopping it into half-rings. The first time I made this, a big question I had was whether the onions should be raw or pre-cooked before going onto the pizza. My internet research proved unhelpful as there seemed to be several people who swore by putting them on raw and several others who insisted they should be cooked. One person even described an elaborate method that involved marinating the onion in wine for a full day beforehand!

While I was not about to try the marinating method, I did decide to do an experiment in which I covered one half of the pizza with raw onions and one half with pre-sautéed onions. In my opinion, the sautéed onions tasted much better, so that is the recipe I'm giving here.

Onion Experiment

After you've chopped the onion, heat some olive oil in a pan. When the oil is hot, add the onion and let cook a few minutes until tender. Sprinkle generously with salt and pepper, stir a bit, and then remove the pan from heat to let the onion cool.

Chop up the mozzarella and tuna, and wash the cherry tomatoes and slice them into halves. Be sure to have your tomato sauce, oregano, and a spoonful of olive oil ready.

When the dough has doubled in size (after about an hour or an hour and a half), take it out and roll it out onto a well-floured surface. For those of you using baking stones, another trick you can use to keep the dough from sticking to the pizza peel is to start by rolling it out onto a different floured surface and then transfer it to the peel before you add toppings. I also sprinkled some semolina onto the peel, but I decided I didn't like the taste when the pizza was done, so I don't think I'll be doing that again soon.

When rolling out the pizza, it's good to keep it in the air a fair amount, tossing it gently and then spinning it a bit so it stretches evenly. When you get it pretty well tossed, you can also go around stretching out the edges to make it bigger and thinner. Remember that a true pizza should have a very thin crust!!

When the pizza is ready, test to make sure it's not sticking to the peel by lightly bouncing the peel up and down a few times and seeing if the pizza moves. If not, unstick it now before you add all the ingredients, after which it will become impossible. It's also important not to weight the pizza down with too many ingredients, though these ones are so good that it's hard for me to stick to that rule!!


Spoon on the tomato sauce, spreading it evenly across all but the very outer edge. Sprinkle the mozzarella over it, then the onions, tuna, and finally the cherry tomatoes. Try to place the cherry tomatoes facing up so that the skin doesn't burn.

Drizzle everything with olive oil and then sprinkle oregano over the top. Place the pizza into the oven, keeping the peel level and just bumping it slightly to get the pizza onto the stone (of course, if you're using a baking sheet you don't have to worry about any of this).

Let the pizza bake for about 8-10 minutes, remove from the oven, let cool just a bit and eat up!

Wednesday, November 12, 2008

Crustless Vegetable Quiche

It's always nice when you make something for the first time and it actually turns out pretty decent!


I had some eggs and vegetables to use up and I realized I had never made a quiche before, and it might be fun. I wasn't really in a pastry-making mood (I also didn't have time) so I decided to make a crustless quiche and, in addition to being very tasty, it was so easy!

You will need:
2 eggs
About half a cup of milk
100 g emmenthaler (gruyère would probably also be lovely)
A small bunch of swiss chard (or spinach)
1 leek
Half a zucchini
Half a pepper
1 carrot
Several leaves of parsley
Salt
Pepper
Allspice

First, prepare the vegetables. Wash the swiss chard and tear it into smallish pieces. Wash the zucchini and pepper and chop them into little cubes. Peel the carrot and chop it into little cubes too. Finally, wash the leek. Leeks tend to get pretty dirty so they require special washing (but they're so delicious it's worth it). My technique is to first tear off the outer leaves, then chop off the top part where the leaves are all splayed out. At this point, I give it a quick rinse and then slice through cross-wise from the top down to just above the root. Then I hold the leek under the sink and splay the leaves out, rinsing thoroughly in between them to get out any icky little dirt particles. After the leek is well washed, chop it up and then also wash and chop the parsley.

Preheat the oven to about 180º C / 355º F. In a large sauté pan, heat some olive oil. When the oil is hot, add the leek and let cook until tender (a couple minutes). Once the leek is tender, add the swiss chard, in bunches if necessary so that there's only one layer covering the pan at all times.

Once the swiss chard has diminished substantially in size, add the zucchini, carrot, and pepper. Let everything cook for 5-10 minutes, stirring from time to time. Once the vegetables are somewhat cooked, turn off the heat and let them cool while you prepare the rest of the ingredients.

Butter the bottom and sides of a round pan and then cover the buttered surface with a thin layer of flour. In a bowl, beat the eggs, and add the milk. Grate the emmenthaler into the mixture, and mix everything up. Add in the flour, salt, pepper, and allspice and mix again. Finally, add the vegetable mixture along with the parsley and stir everything up thoroughly.


Pour the mixture into the pan and place in the oven. Let bake for about 40 minutes and then let cool another 10 minutes or so.

Eat and enjoy!

Saturday, November 8, 2008

Spaghetti with cream of zucchini

I promised to post a recipe for a pasta that was not penne and so, here it is!


The idea for this dish came about because of the large zucchini that had been sitting in my fridge for nearly a week and clearly needed to be dealt with. This is how a good number of my recipes come about (and I might guess, many other people's recipes as well): I think "hmmm, I need to get rid of this ___(insert perishable food item)___. Now, what would be a fun way to do that?"

This time, the idea of a creamy zucchini sauce really appealed to me and it was something I had never tried before, so I decided to give it a go!

While the basics of the sauce weren't that hard to figure out, I had a lot of trouble deciding which cheese I wanted to go with my zucchini (being slightly lactose-intolerant, I'm not a big fan of sauces that use actual cream, which is a shame). Ricotta seemed like an obvious choice but I just wanted something different this time. The only problem was that I didn't have any idea what that "something different" would be. I went to three grocery stores, hoping for that one cheese that would just pop out at me, and finally, at the third - the one with the best selection of cheeses - I found one that looked promising - a cheese by the name of Laura Chenel Chef Chevre. This soft chevre, I decided, was just the thing for my zucchini sauce.

An excellent idea, as it turned out. Though I'd never seen a zucchini-chevre pairing before, I'm a big fan of goat cheeses in general, and the lightness of the chevre was a good companion for the delicate zucchini. The only issue with this combination was that the sauce was a bit drier than I would have liked - an issue which can easily be fixed by adding in a bit of milk along with the cheese.

You will need:
75 g of spaghetti (I finally got a kitchen scale so I could actually measure instead of just guessing!)
One largish zucchini
One shallot
Extra-virgin olive oil, which I have just realized is what is being called "olio EVO" in all these Italian recipes, i.e. "olio ExtraVergine d'Oliva"
About 50 g chevre
Half a glass of white wine
Salt
Pepper
A few spoonfuls of milk/cream

Chop up the shallot and wash the zucchini, cutting off the ends. Using the large holes of a cheese grater, grate the zucchini into little striplets. If you don't have a cheese grater, you can chop up the zucchini into very tiny pieces, or find some other tool that will help you get the zucchini into a similar state. Whether you add the peel or not is up to you. I like to add it in, but I have to chop it up since I haven't found a way to grate an entire zucchini without also grating my fingers!


When grating, do not use the fine holes of a grater or a microplane or any such thing. You will get a bunch of very messy and difficult mush, as I discovered the first time I tried to grate zucchini.

In a large pot, bring some water to a boil. When it's boiling, salt it and add the spaghetti. Then, heat the olive oil in a sauté pan. When the oil is hot, add the chopped-up shallot. I always test the olive oil by flicking a few droplets of cold water onto it and seeing if they start jumping and sizzling. If they do, I know the oil is hot enough.

Once the shallot starts to become translucent and give off its lovely shallot aroma, add the grated zucchini. Sprinkle salt and pepper over everything, and then pour the white wine in.

Let the zucchini cook until the white wine has evaporated. While it's cooking, crumble or chop the chevre into smallish chunks. Once the wine has pretty much all evaporated, add in the cheese and the milk/cream. Stir everything up and drain the pasta, if you haven't already (you should be testing to see if it's done while preparing the sauce and drain it the minute it stops being raw in the center). Add the pasta into the sauce, stirring everything up again so the pasta is well-coated.

Serve warm and enjoy!

Wednesday, November 5, 2008

Roasted Red Pepper and Feta dip

This dip was mainly inspired by Htipiti, which is a Greek spicy pepper and feta dip that I first encountered at a Greek restaurant a few months ago and loved. I looked it up online but could only find two recipes, and while they both looked good, neither of them actually had you roast the peppers and for some reason, I really like roasting peppers. So I created my own Htipiti variation, and it turned out to be quite delicious!


From what I gathered from my online research, it seems Htipiti is generally quite spicy. In fact it is usually made with only hot peppers. I had a lovely bunch of sweet red peppers at hand, so that's what I used, but I added some crushed chilli pepper to give everything a bit of spice, and you can certainly add more if you like your food hot!


You will need:
4 largish red peppers
125 g feta
One red onion
A spoonful of olive oil
A couple spoonfuls of lemon juice
A small bunch of parsley
Salt
Pepper
Crushed chilli pepper

Preheat the oven to 180º C/355º F. While the oven is heating up, wash and dry the peppers and place them on a foil-lined baking sheet.

Once the oven is hot, put the peppers in and let them roast for about 30-40 minutes (depending on their size), turning them every so often so they cook evenly.

When the skin of the peppers is all black and crinkly, take them out of the oven and wrap them up fairly tightly in the aluminum foil (if the sheet they were roasting on isn't big enough, place another one on top).

While the peppers are cooling, prepare the other ingredients. Chop up the onion and wash and then tear or chop the parsley. Put the onion and parsley in a bowl and drizzle with the olive oil and lemon juice. Add the salt, pepper, and crushed chilli pepper, and stir well. Let sit for at least 15 minutes.


Once the peppers are easily handled (probably give them about 15-20 minutes), unwrap them from the foil and peel off the skins. Use a knife to scrape out all the seeds and any long white fleshy bits. Chop up the remaining pepper flesh and then place it all in a bowl and mash up thoroughly.

Add the onion-parsley mixture to the peppers and then crumble up the feta and mix it in too. Stir everything until it's well mixed and either serve immediately or place in the refrigerator to eat later.

I baked some pita to go with mine, adding a few cucumber slices for good measure!

Monday, November 3, 2008

Potato Gnocchi

I remember the first time I ate gnocchi, I was amazed that anything could possibly be so good! I was even more amazed when I realized I could make them on my own, and it's not even that difficult. If you've never made your own gnocchi, I strongly suggest you try, at least once, just for the fun of it!


You will need:
1 large potato per person
100 g flour for every potato

You want to use yellow potatoes that are nice and starchy. If you can't find good potatoes, it's not really worth it, so wait until you see some nice ones.


Place the potatoes in a large pot of water and bring the water to a boil. Let the potatoes cook for a long time until they're nice and soft (test with a fork).

When the potatoes have softened, drain them and run some cold water over them very briefly, just so that you will be able to handle them. Peel off the skins and mash them up thoroughly.

Dump the still-warm potatoes onto a well-floured board and mix the flour in with them, kneading for a few minutes. Though most recipes call for plain old white flour, I've used both whole wheat and semolina, and I liked both quite a bit. Another note here is that many people also mix in an egg with the flour and potatoes. I generally don't, and I think the gnocchi come out well either way.

After you've kneaded for a bit, roll out portions of the dough into long cylindrical strips, about the width of a finger.


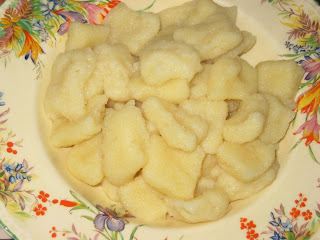
Chop the strips into little squares with a knife. If you have a rounded cheese grater, press the gnocchi against it to get little patterns. You can also use one of those wooden boards with horizontal ridges on it to get striped gnocchi. As I had neither of these tools at my disposal this time, I just rounded out the gnocchi by pushing into their centers with my thumb, but here are some whole wheat gnocchi I made back in Milan when i did have a rounded cheese grater:


After you shape the gnocchi, put them on a well-floured plate or towel. At this point, you can let the gnocchi sit until it's time to eat.

When you're ready to cook the gnocchi, heat some water in a large pot. When the water is boiling, salt it, and then add the gnocchi, making sure not to crowd the pot (add them in groups of say 15-20 at a time, adding one group after you're removed the previous one). As the gnocchi rise to the top, ladle them out with a slotted spoon and place them in your serving dish.


Serve with the sauce of your choice. I like to make my gnocchi with tomato sauce (I also added sage to the sauce this time) and then grate a healthy dose of parmesan on top, as you can see here.


Eat warm and enjoy!

Sunday, November 2, 2008

Provolone and Arugula Tartine

I'm not a big arugula-eater, but every so often I'm suddenly and mysteriously attracted by a sandwich or a pizza with arugula and today was one of those days when out of nowhere I decided that arugula would be the perfect thing for lunch.


It wasn't quite out of nowhere actually - what happened was that as I was wandering the stalls of the farmer's market, the rain, which had been fairly light, suddenly increased into quite a downpour (at least for California). Being without an umbrella, I decided to wait it out under the stall where I had just purchased a lovely bunch of carrots. While waiting, I started looking over all the vegetables again, and a bin of arugula caught my eye. It occurred to me that the arugula would probably go very well with the provolone I had sitting in my refrigerator, and so the idea for the tartine was born. I bought my arugula, the rain let up a bit, and I hurried home to try out my idea.

As it turned out, the arugula went wonderfully with the provolone, the spiciness of the cheese contrasting nicely with the slightly bitter arugula, with everything rounded out by the sweetest of the tomatoes. A lovely little lunch, and very very easy to make!

You will need:
Good bread. I am very picky about my bread and never ever buy anything pre-packaged, pre-sliced etc. I'll either bake my own or buy some fresh-baked by my two favorite local bakeries.
Several slices of provolone
A small bunch of arugula
4 or 5 smallish tomatoes or 2 or 3 larger ones

Slice the bread and cheese and lay the slices of cheese on the bread. Heat the bread and cheese, preferably in a toaster oven if you have one. I do not have one and attempted to heat the bread and cheese in a frying pan, which was OK except that it burnt the frying pan a bit. In retrospect, heating the bread on a foil-lined baking sheet in the oven would probably have been a better idea.


Wash and chop up the arugula and tomatoes. Place the arugula on top of the cheese, followed by the tomatoes. Eat up!

Saturday, November 1, 2008

Penne with Spinach and Feta

It seems I post quite a few pasta recipes that involve penne. This is a bit odd, since I'm sure I eat far more spaghetti than penne. And besides spaghetti I actually have three favorite types of pasta asciutta - literally "dry pasta" (this is as opposed to pasta fresca, or "fresh pasta" which includes things like fettucine and also stuffed pasta - pasta ripiena - like ravioli and tortellini). Anyways, my three favorite types of pasta asciutta after spaghetti are penne, fusilli, and farfalle, so I'm not sure why only penne have made it up here so far, though I will try to correct this error in the future!


However, this particular recipe comes from a little cookbook I picked up in Italy called "Primi piatti di verdure" (vegetable entrées), and that recipe actually calls for sedanini, which are closer to penne than they are to fusilli or farfalle, so I consider myself justified in posting yet another penne recipe, though of course you can substitute other types of pasta if you prefer. Though I found the cookbook rather disappointing overall, there are a few stand-out recipes hidden in it, and this is definitely one of them. Though feta isn't normally a feature of Italian cooking, it works really well with this pasta dish, and I highly recommend you try it out!

You will need:
Penne - 75-100 g per person
About 250 g spinach
A small block of feta
A handful of hazelnuts
One medium-sized shallot
Olive oil
Salt
Pepper
Nutmeg

Though you can also use ricotta instead of feta, I really like the saltier addition of feta, which contrasts nicely with the hazelnut and nutmeg. Please also use real hazelnuts if you can, and not filberts, which I've found don't have anywhere near the same flavor. It's true that hazelnuts are absurdly expensive around here, but in my opinion it's worth it for the taste!

Wash and dry the spinach, removing any hard stem parts, and tear the leaves up, setting them aside in a large bowl. Chop/grind the hazelnuts into little bits and chop up the shallot.

In a large pot, bring some water to a boil. When it's boiling, salt it and add the penne. Heat some olive oil (butter in the original recipe) in a fairly large sauté pan. When the oil is hot add the shallot. After a minute or so, add the ground-up hazelnut. After another minute or so, add the spinach, in parts if necessary so that there's only one layer covering the pan. The recipe also says to add some of the cooking water from the pasta, which I invariably forget to do. I think it just makes everything more sauce-like, but I forgot this time and it was still fine.

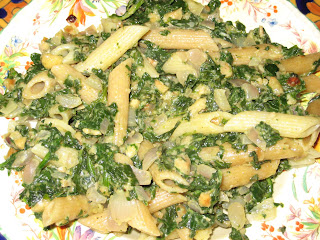
Add salt, pepper, and nutmeg to the spinach and let cook, stirring frequently. After the spinach is fairly well-cooked, chop or crumble the feta and stir it in. Turn the heat to low and let everything cook another few minutes so that the feta melts, not forgetting to stir.

Drain the penne and add them to the spinach-feta mixture, mixing everything up until the penne are well coated with sauce. Turn off the heat and spoon the penne into your serving bowl. Serve warm!